What went wrong.
What I feel was the least succesful about the modeling process was possibly the hair. Which after a lot of comitment to accurate modelling throughout the hair I felt let it down. On the plus side I feel my over method was great at a close representation of my own hair. I took care and extra time when making the UVW map by putting hair in the material.
What felt went well.
I am glad that I spent alot of time on each guide video being very accurate to his own methods. This created me from the very start good topology lines for the face, which corresponded to good feature lines within the 3d face. I took care throughout about the mesh and keeping vertex welded etc, to keep a clean model to avoid problems further down the line. I spend a conciderable amount of time modelling the back of the head and the neck, simplifying it but at the same time trying to include detail such as, adams apple, neck muscles and bones.
I am very pleased with my head model, the main reason being that I spent a lot of my spare time perfecting it as I enjoyed it so much and I do feel that it shows.
Friday, 22 October 2010
The Finishing the model
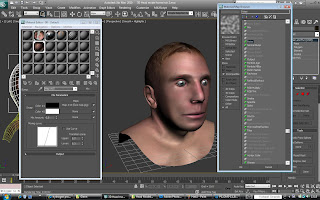
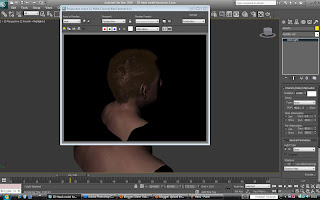
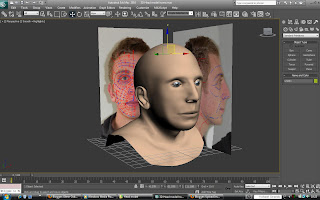
This images shows the start of layering the materials and textures, trying to create an accurate skin effect. As you can see with this image I have applied a too high specular level and gloss.
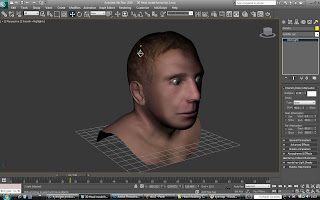
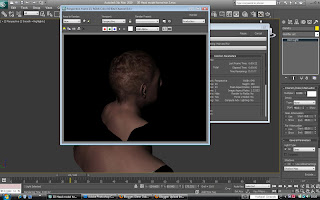
Getting better, as you can see from compairing the image above the hair has been raised to create a realistic look. Not just flat hair on the scalp.
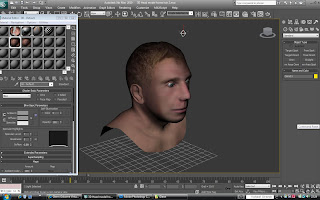
This image bellow shows how I am happy with my finished editing with the materials.
Render
Render


Getting better, as you can see from compairing the image above the hair has been raised to create a realistic look. Not just flat hair on the scalp.

This image bellow shows how I am happy with my finished editing with the materials.

Render

Render

Modeling the Hair
To start modelling the hair I selected the top polygons of my head where the hiar will go, and copied this, then detached it from the main head. I applied a "Hair and fur" modifier to it which is a great tool for creating realistic hair. Firstly I trimmed it to lenght and then started to use the brush to move the hair into position, similar to mine. This is a very time consuming process to try to get an accurate representation of my hair, style, colour etc.
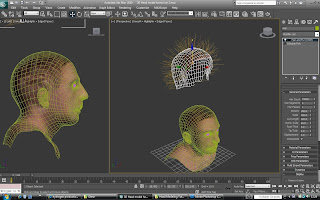
Here shows positioning the scalp back onto the head and doing some more adjustment using the hair brush.
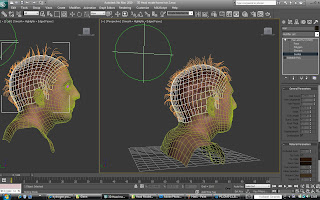
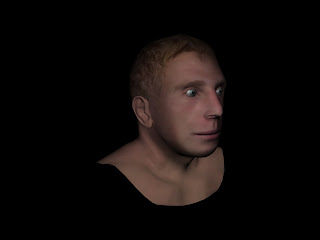
Here shows the hair rendered, I spent a long time trying to get an accruate colour of my hair but after adjusting all the settings still I was not that happy with it.
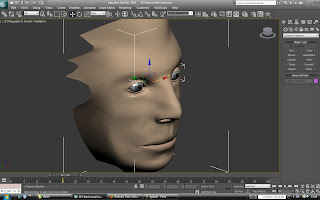
This image bellow shows my head without the hair modifier on it. What i did to create this look of my hair was to edit the polygons and vertex of the scalp, pulling and twisting it were my hair raises and falls creating texture and depth to my hair. I personaly prefer this version, as I think it looks more like myself.

Here shows positioning the scalp back onto the head and doing some more adjustment using the hair brush.

Here shows the hair rendered, I spent a long time trying to get an accruate colour of my hair but after adjusting all the settings still I was not that happy with it.

This image bellow shows my head without the hair modifier on it. What i did to create this look of my hair was to edit the polygons and vertex of the scalp, pulling and twisting it were my hair raises and falls creating texture and depth to my hair. I personaly prefer this version, as I think it looks more like myself.

Thursday, 21 October 2010
Layering the face maps
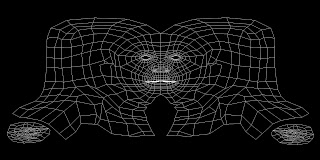
From 3ds Max I save my image that is produced by the UVW Unwrap modifier, which leaves me with what Is shown bellow in the image. If I save this file as a btmp, then just the white lines are saved and not one image with the black in it too, which is much easier when moving into Photoshop as I would need to remove the black anyway. This image gives me a guide to where diferent peices of my face and skin should go, coresponding to the polygons.
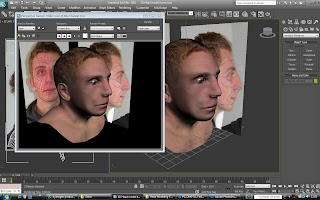
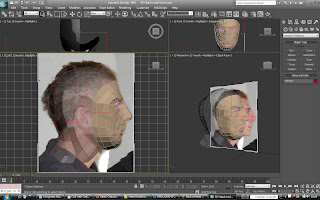
The next step is to start chopping up images of my head, profile and face on. Then placing them in the correct place amoughts the guide of polygons, this creates a flattened and stretched look. This is correct as the three diamentions of the model will stretch and distort a standard image of a face, where as this image and method already knows where stretching will take place and acomodates for it.
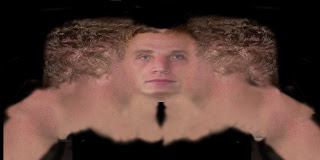
Once this map was complete I tested on my model and continuosly made adjustments in photoshop which then appeared in 3ds max and in the final outcome. Allowing me to adjust in photoshop in a even more acurrate way.
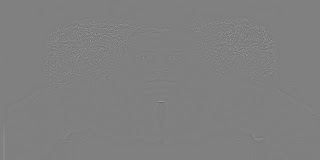
Bellow shows an image which is quite difficult to see, but this is the bump map to my skin. This basicaly is a layer that I add in the material in 3ds max, which dosent transfer colour onto my head, but shadow in these places. This ellusion creates the feel of creases, dimples, spots, and pores etc in the very clever "Bump map" with in the material parameters.
This map is created by an overlay layer of the skin map, then with a "High pass" sharpening tool applied to it, adjusted so that only detail is shown in lighter colours NOT shadding itself.
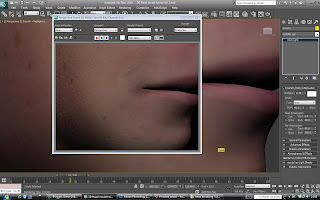
This bump map is not quite enough to create realistic skin, as skin has a uniform pattern of pores almost, this is not transfered with this map so precisly. Using a "Mix" child in the material parremeters I combine this face bump map, with a noise bump map. Reducing the noise conciderably almost to the lowest setting, creating a bumpy ripple effect the size of pores. A you can see bellow.

The next step is to start chopping up images of my head, profile and face on. Then placing them in the correct place amoughts the guide of polygons, this creates a flattened and stretched look. This is correct as the three diamentions of the model will stretch and distort a standard image of a face, where as this image and method already knows where stretching will take place and acomodates for it.

Once this map was complete I tested on my model and continuosly made adjustments in photoshop which then appeared in 3ds max and in the final outcome. Allowing me to adjust in photoshop in a even more acurrate way.
Bellow shows an image which is quite difficult to see, but this is the bump map to my skin. This basicaly is a layer that I add in the material in 3ds max, which dosent transfer colour onto my head, but shadow in these places. This ellusion creates the feel of creases, dimples, spots, and pores etc in the very clever "Bump map" with in the material parameters.
This map is created by an overlay layer of the skin map, then with a "High pass" sharpening tool applied to it, adjusted so that only detail is shown in lighter colours NOT shadding itself.

This bump map is not quite enough to create realistic skin, as skin has a uniform pattern of pores almost, this is not transfered with this map so precisly. Using a "Mix" child in the material parremeters I combine this face bump map, with a noise bump map. Reducing the noise conciderably almost to the lowest setting, creating a bumpy ripple effect the size of pores. A you can see bellow.

Unwraping the map for my texture
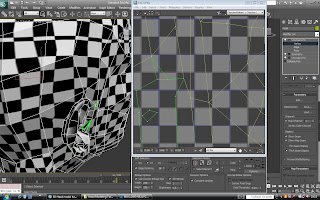
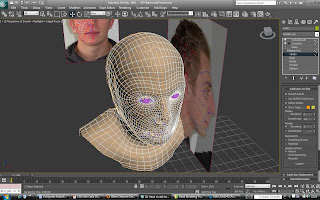
This is the stage where I apply a checker pattern onto my model, to look for stretching and distortion of the texture. To lay a texture around the complex shape of the head I have to unwrap all the polygons onto a flat sheet. I use a modifier tool to do this called Unwrap UVW map.

Slowly adjusting the UVW map updates my model so I can see where I need adjustment to keep the checker pattern uniform and and as least stretched as possible.
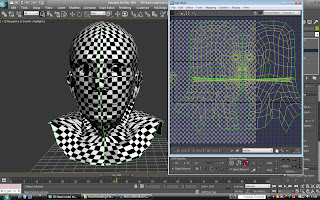
This shows adjusting the mess, made from the indiviual polygons, as i move them the checker changes, this is a long process which can be sped up by some tools in the modifier such as the Relax tool. This creates smoother curves in amoungst the polygons, making the pattern flow better to the eye.

Bellow shows inside this modifier with the polygons of half of my head flatened out, this is very ruff when first applied, and the polygons are to flat and spaced out enough to alow even coverage of a new texture.

Slowly adjusting the UVW map updates my model so I can see where I need adjustment to keep the checker pattern uniform and and as least stretched as possible.

This shows adjusting the mess, made from the indiviual polygons, as i move them the checker changes, this is a long process which can be sped up by some tools in the modifier such as the Relax tool. This creates smoother curves in amoungst the polygons, making the pattern flow better to the eye.


Friday, 15 October 2010
The Ear
Here I am creating the ear for my model, I used the same process that I used for modeling the face by using topology. I openend up my photoshop file and on the profile view I added topology lines flowing around the ear, using this stage to plan where I will need to select lines and vertex to pull or push on to create the 3D shape.
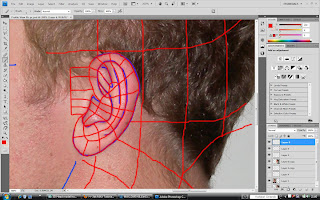
I then moved into 3ds Max where I created the flat polygons, from there I started to extrude the model using the front and left view to know where to place my vertex.
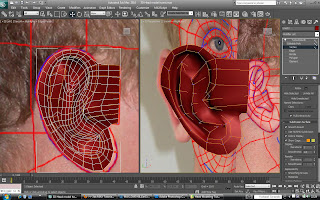
This took some time of trial and error to create the lines in my own ear, but here is the ear almost finished.
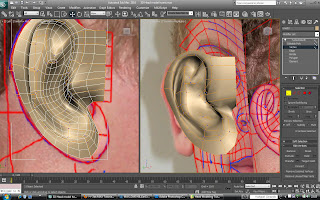
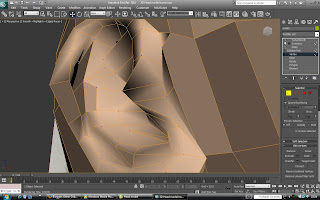
Last stage of making the ear is stitching it onto my head model, I used the same process as with making the head on the face by welding the vertex.
To stictch the ear to the head I counted the number of polygons on the outer edge of my ear, and the created a hole in the head and kept that same amount of polygons and arranged them in a similar position to make it much easier to fit in the correct position.
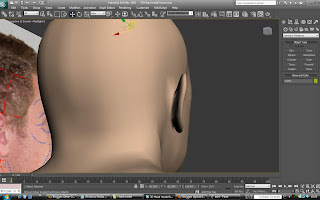
Bellow shows it sewn on the model and positioned in a life like position. I am very happy with how it turned out and the flow of polygons with the turbo-smooth is consitant and clean.

I then moved into 3ds Max where I created the flat polygons, from there I started to extrude the model using the front and left view to know where to place my vertex.

This took some time of trial and error to create the lines in my own ear, but here is the ear almost finished.

Last stage of making the ear is stitching it onto my head model, I used the same process as with making the head on the face by welding the vertex.

To stictch the ear to the head I counted the number of polygons on the outer edge of my ear, and the created a hole in the head and kept that same amount of polygons and arranged them in a similar position to make it much easier to fit in the correct position.

Bellow shows it sewn on the model and positioned in a life like position. I am very happy with how it turned out and the flow of polygons with the turbo-smooth is consitant and clean.

Tuesday, 12 October 2010
Modeling the back of head
Bellow shows me creating flowing lines with the polygons, and bringing the down to the neck.
After attaching the back of the head to the face it now acts on the symetry modifier.
Now I can refine the whole shape of the head and the face as it is all one piece.
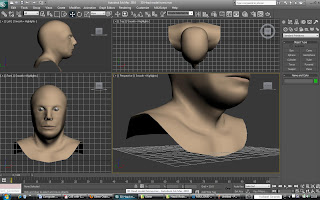
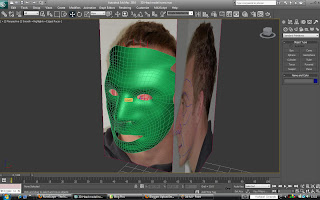
Here is a turbo-smoothed result of my model so far, I am realy happy with how it is coming on. I feel I need some more detail in the neck, to add some more character.
To add detail to the neck I had to add more polygons to the model, I tried to create muscles in the neck and collar bones.

After attaching the back of the head to the face it now acts on the symetry modifier.
Now I can refine the whole shape of the head and the face as it is all one piece.

Here is a turbo-smoothed result of my model so far, I am realy happy with how it is coming on. I feel I need some more detail in the neck, to add some more character.

To add detail to the neck I had to add more polygons to the model, I tried to create muscles in the neck and collar bones.

Preparing the face
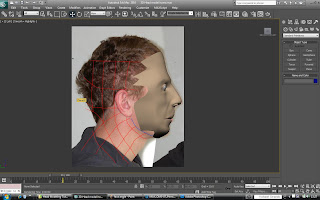
I am pretty happy with how the face looks now, so the next step is to model the back of the head and the neck. I opened up my photoshop file with profile image of me in it. I created more topology lines on the head and down the neck, these will be used as guides in 3ds max.
Before I could go much further I had to clean up the polygons around the edge of my face, creating a simpler ring of vertexs to model the new part of the head too.
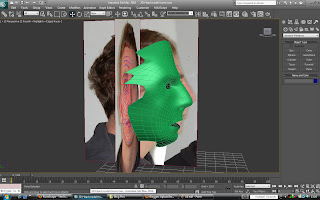
Seen below is the basic shape of the head which is a sphere, much of it is not needed, the main polygons which flow of the head and down the back are used. These create a good base to start modelling from.
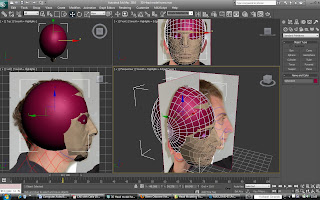
Just one side of the head is needed at this time, as when I combine this onto the face the symetry modifier will act on this too, mirroring it for me.


Before I could go much further I had to clean up the polygons around the edge of my face, creating a simpler ring of vertexs to model the new part of the head too.
Seen below is the basic shape of the head which is a sphere, much of it is not needed, the main polygons which flow of the head and down the back are used. These create a good base to start modelling from.

Just one side of the head is needed at this time, as when I combine this onto the face the symetry modifier will act on this too, mirroring it for me.


Monday, 11 October 2010
Adding detail
At this stage I am almost happy with the shape of the model, so I started to add the features into it which couldnt be translated through the topolgy.
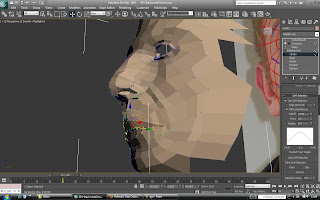
By eye I started to extrude and create new polygons to create an accurate representation of the nostrils.
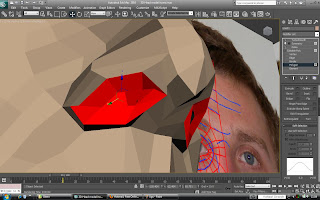
Lips.
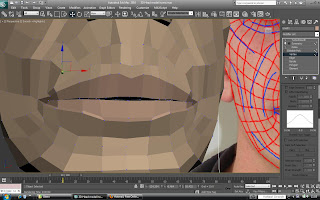
Eyelids
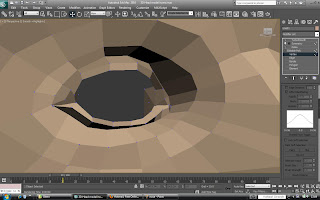
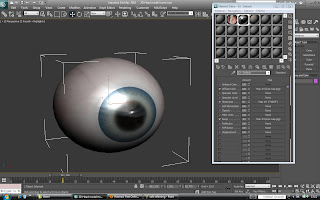
I spent some time with the materials and shape of the eyeball, creating reflection and a shiny quaility to it.
Lips.
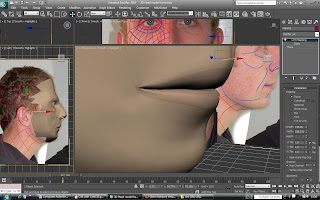
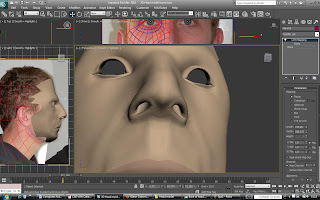

By eye I started to extrude and create new polygons to create an accurate representation of the nostrils.

Lips.

Eyelids

I spent some time with the materials and shape of the eyeball, creating reflection and a shiny quaility to it.

Lips.


Sunday, 3 October 2010
Moving from 2D to 3D
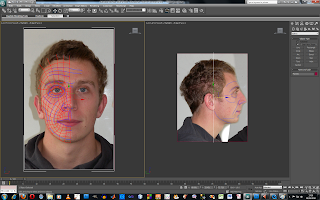
I started to pull the vertex of the flat polygons out to the profile image of my face. Selecting the vertex I want on the front veiw, and then switching to the left view I move each vertex out individualy to where it it lines up on my face.
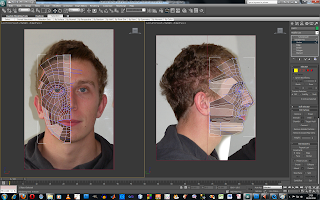
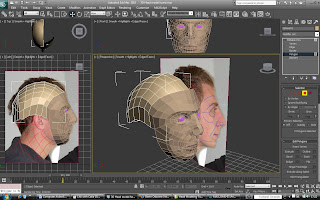
When all the vertex where positioned fairly accuratly, I then changed into the perspective view and started to tweek their position. Using the two images as references of my face, and also using a mirror to "eyeball" the modelling into a more and more accurate representation of myself.
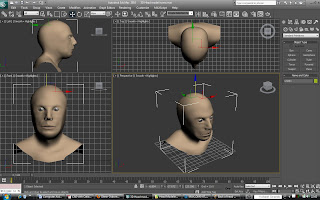
Here I used a modifier called Symmetry that will mirror the model from whereever you select it too. I made the centre line of vertexs planar, and then used that line to mirror.
Bellow shows that I have used a turbo smooth modifier, I used this over the NURMS smoothing, as this is a seperate modifier that smooths it a level above symmetry. Which means that I will get less pinching in the middle of my model.

When all the vertex where positioned fairly accuratly, I then changed into the perspective view and started to tweek their position. Using the two images as references of my face, and also using a mirror to "eyeball" the modelling into a more and more accurate representation of myself.

Here I used a modifier called Symmetry that will mirror the model from whereever you select it too. I made the centre line of vertexs planar, and then used that line to mirror.

Bellow shows that I have used a turbo smooth modifier, I used this over the NURMS smoothing, as this is a seperate modifier that smooths it a level above symmetry. Which means that I will get less pinching in the middle of my model.

Moving into 3Ds MAX
From the last image of my topology I have spent some time refining it and making it just right.
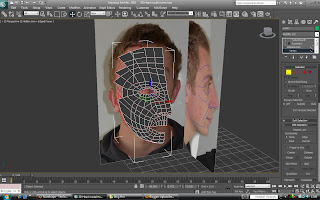
From here I now move into 3Ds MAX, I firstly import the images onto to planes at 90* to each other and use the UVW mapping to position the profile or front view of my face on each plane.
Planes in 3D max
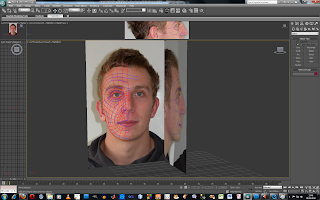
Using these veiw ports to start the modeling
Using the create polygon tool, I traced over my image I made in photoshop using the topology lines.
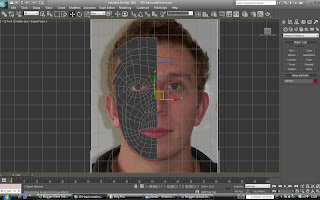
From here I now move into 3Ds MAX, I firstly import the images onto to planes at 90* to each other and use the UVW mapping to position the profile or front view of my face on each plane.
Planes in 3D max

Using these veiw ports to start the modeling

Using the create polygon tool, I traced over my image I made in photoshop using the topology lines.

Subscribe to:
Posts (Atom)